AI Tool Usage Guide
When developing with Cursor, Claude Desktop, VS Code, and other AI tools, add MCP config in your business project so the Agent can learn from the docs.
1. What we provide / What you do
| Role | Content |
|---|---|
| Open Platform (us) | Docs site, llms.txt, MCP config sample, official Skill |
| You (Cursor example) | Confirm config path & layout → add .cursor/mcp.json → enable mos-developer-docs in Settings → verify → add Skill |
Your project                         Open Platform
──────────                          ─────────
.cursor/mcp.json          ──MCP──►  https://developer.mosapp.app/llms.txt
.cursor/skills/                       https://developer.mosapp.app/guide/sdk.html etc.
  mos-developer-docs/SKILL.md
2. MCP Configuration (Cursor example)
2.1 Config path (Cursor)
Before adding MCP config, confirm where the file lives:
| Purpose | Path |
|---|---|
| Project MCP (recommended) | .cursor/mcp.json at project root |
| Global MCP (all projects) | ~/.cursor/mcp.json |
In Cursor, use Settings → Plugins → Tools & MCPs to check MCP status; the config file is .cursor/mcp.json above.
2.2 Recommended project layout
Prepare this structure at the chosen path (next step writes MCP config into .cursor/mcp.json):
your-miniapp-project/
├── src/
└── .cursor/
    ├── mcp.json                 # required: MCP config
    └── skills/
        └── mos-developer-docs/
            └── SKILL.md         # see Skill Configuration below
2.3 Add MCP config
Node.js version
| Scenario | Requirement |
|---|---|
Official sample below (pinned [email protected]) | Node 18+ |
Latest mcp-fetch-server without a version pin | 20.19+, 22.12+, or 24+ recommended (jsdom 28; Node 18 often fails) |
Copy the following into .cursor/mcp.json (recommended to commit to Git):
{
  "mcpServers": {
    "mos-developer-docs": {
      "command": "npx",
      "args": ["-y", "[email protected]"],
      "url": "https://developer.mosapp.app/llms.txt"
    }
  }
}
If you already have other MCP servers, only append the
mos-developer-docsentry. Requires Node.js 18+;npxfetches the pinnedmcp-fetch-serveron first use.
Windows: if npx fails to start, change command / args to:
{
  "mcpServers": {
    "mos-developer-docs": {
      "command": "cmd",
      "args": ["/c", "npx", "-y", "[email protected]"],
      "url": "https://developer.mosapp.app/llms.txt"
    }
  }
}
You can also verify against the hosted file: mos-developer-docs.mcp.json
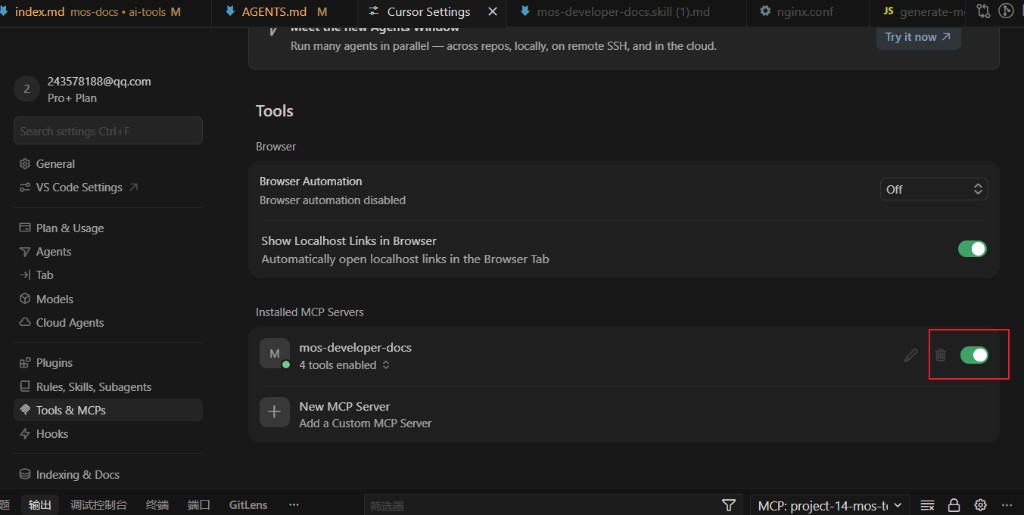
2.4 Enable MCP in Settings (Cursor)
After writing .cursor/mcp.json, turn on the MCP connection in Cursor Settings:
- Open Cursor Settings
- Go to Plugins → Tools & MCPs in the sidebar
- Under Installed MCP Servers, find
mos-developer-docs - Toggle the switch on the right to On; something like “4 tools enabled” means it is connected
2.5 Verify
Open the Agent chat in Cursor and enter:
Use MCP to look up the MosApp mini app payment flow
Expected result: The Agent correctly answers with the payment flow documentation.
3. Skill Configuration
Skill provides doc URLs and reading order; MCP fetches page content.
3.1 Install Skill (recommended for teams)
- Copy the full text of mos-developer-docs.skill.md and save as
.cursor/skills/mos-developer-docs/SKILL.md - Confirm path:
.cursor/skills/mos-developer-docs/SKILL.md - Commit to Git for the team
3.2 Prompt you can paste into project Rules
This project integrates with the MosApp Open Platform. Docs root: https://developer.mosapp.app
1. Use MCP fetch to load https://developer.mosapp.app/llms.txt for the index
2. Then fetch specific pages, e.g. https://developer.mosapp.app/guide/sdk.html
3. Do not invent APIs; confirm with the user if something is not in the docs